Why your mobile glass tech uses a vacuum on your chip
Why Your Mobile Glass Tech Uses a Vacuum on Your Chip: The Science of Resin Displacement
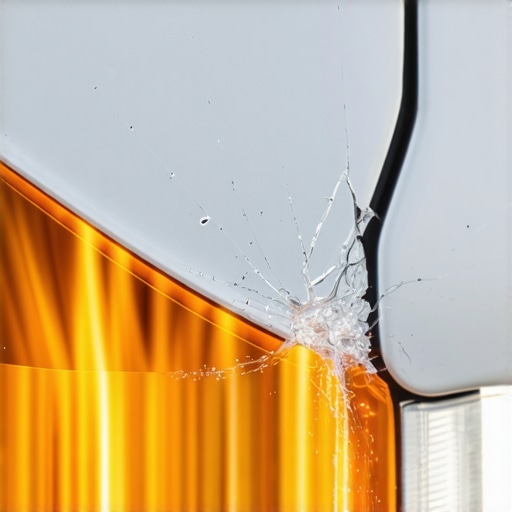
If you have ever been driving down the highway and heard that sickening click of a stone hitting your windshield, you know the immediate feeling of dread. It usually starts as a tiny bullseye or a star-shaped fracture. Most drivers think that a chip repair is simply a matter of dabbing some glue into the hole and moving on. However, as a master glazier with a quarter-century in the field, I can tell you that what happens next is a delicate dance of physics and chemistry. If your glass installer simply drops resin into the break without employing a vacuum cycle, they are performing what I call a ‘smear and steer’ job. It is a fundamental failure of the trade that ignores the atmospheric reality of laminated glass.
The Condensation Crisis: A Master Glazier’s Perspective
I recall a specific incident where a homeowner called me in a panic because their windshield, which had been ‘fixed’ by a cut-rate mobile service just two days prior, was suddenly ‘sweating’ from the inside of the repair. I walked out to the driveway with my hygrometer and a high-power magnifying loop. It was a cold November morning, and the humidity was hovering around 65 percent. I showed the client that the previous technician had failed to evacuate the air from the break. Because they didn’t use a vacuum, they had actually trapped ambient moisture inside the microscopic fissures of the glass. When the driver turned on their defroster, that trapped moisture expanded and turned into steam, causing the resin to delaminate and the chip to turn into a foot-long crack. It wasn’t the glass that failed; it was the installer’s refusal to respect the laws of thermodynamics.
“Installation is just as critical as the window performance itself. A high-performance window installed poorly will fail.” AAMA Installation Masters Guide
In the world of same-day glass repair, speed is often the enemy of quality. To understand why a vacuum is necessary, we have to look at the anatomy of the glass itself. Your windshield is not a single slab of glass; it is a sandwich of two layers of annealed glass with a Polyvinyl Butyral (PVB) interlayer. When a rock hits the outer layer, it creates a void. That void is not empty; it is filled with air, dust, and, most importantly, moisture. If you simply apply resin over the top, you are essentially trying to pour water into a bottle that is already full of air. The air has nowhere to go, so it stays trapped, creating a structural weak point and a visual blemish.
The Physics of the Vacuum: Boyle’s Law in Action
When a professional glass installer attaches their bridge and injector to your windshield, the first thing they do is engage a vacuum cycle. This is not just for show. By creating a vacuum, the technician is lowering the atmospheric pressure inside the break. According to Boyle’s Law, as the pressure decreases, the volume of the air bubbles increases, allowing them to be pulled out of the tightest microscopic fractures. We are talking about fissures that are thinner than a human hair. Without a vacuum, the surface energy of the glass and the viscosity of the resin would prevent the liquid from ever reaching the tips of those cracks. The vacuum removes the ‘air wall,’ allowing the resin to achieve a total ‘wetting out’ of the surface.
The Role of Surface Tension and Capillary Action
Once the air is removed, the technician then switches the tool to a pressure cycle. This is the second half of the chip repair equation. Now that the void is a vacuum, the resin is literally sucked into the break by capillary action, aided by the external pressure of the injector. This ensures that the resin reaches the PVB interlayer and bonds to the jagged edges of the broken glass. In a cold climate like Chicago or Minneapolis, this is critical. During the winter, your glass experiences extreme thermal stress. You might have an exterior temperature of zero degrees and an interior temperature of seventy-five degrees. This creates a massive gradient across the glass. If the repair is not 100 percent solid resin, the air pockets will expand and contract at a different rate than the glass, eventually leading to a structural failure that no mobile service can fix after the fact.
“Moisture contamination within a glass break is the primary cause of adhesive failure in resin-based repairs.” ROLAGS (Repair of Laminated Automotive Glass Standard)
Comparing Architectural and Automotive Glazing Standards
While I spend a lot of time on chip repair, the principles are identical to what we see in residential window installation. When we set a Sash into a Rough Opening, we don’t just throw it in and hope for the best. We use a Shim to ensure level, we apply Flashing Tape to manage water, and we ensure the Sill Pan is properly sloped toward the Weep Hole. In the same way, a windshield repair requires a managed environment. If a technician is working in the direct sun, the Surface #1 temperature of the glass can exceed 150 degrees, causing the resin to cure prematurely before it has fully filled the break. A master tech knows how to shade the glass and manage the temperature to ensure the chemical bond is permanent. They treat the windshield like an Operable window unit, ensuring that every Glazing Bead of resin is perfectly placed.
Thermal Dynamics and the U-Factor of Glass Repair
In the northern regions, we worry about the U-Factor, which measures the rate of heat loss. While a windshield isn’t rated the same way a triple-pane house window is, the thermal performance is still vital. When a chip is properly repaired using a vacuum-pressure cycle, the refractive index of the resin is matched to the glass. This means that light passes through the repair at the same speed it passes through the glass, making the repair nearly invisible. But more importantly, it restores the structural integrity of the glass. The resin acts as a bridge, transferring the load across the break. If you skip the vacuum, you are essentially leaving a hole in your thermal envelope. Just as a Muntin provides structural grid support in a colonial window, the resin provides the internal ‘skeleton’ for the windshield.
The Dangers of DIY Kits
I often see ‘bridge-less’ DIY kits sold at auto parts stores. These kits lack a mechanical vacuum pump. They rely on a simple plastic syringe to try and force resin into the break. As any glass installer will tell you, this is like trying to paint a house with a toothbrush. You might cover the surface, but you aren’t protecting the substrate. Without the vacuum, you cannot remove the microscopic moisture that is trapped in the ‘legs’ of the crack. Over time, this moisture will freeze and expand, forcing the crack to grow. I have seen countless ‘saved’ windshields end up in the scrap heap because a driver tried to save fifty dollars on a mobile service and ended up needing a full replacement of a thousand-dollar ADAS-equipped windshield.
The Final Cure: Why UV Light Matters
After the vacuum and pressure cycles are complete, the tech will apply a curing film and hit it with a specific wavelength of UV light. This causes a photochemical reaction known as cross-linking. The liquid monomers in the resin link together to form long-chain polymers. This process is irreversible. If the vacuum cycle was done correctly, the result is a repair that is actually stronger than the surrounding glass. But if air was left inside, the UV light will cure the resin around the bubble, permanently sealing the flaw into the glass. There is no ‘do-over’ in glass repair. You get one shot to get the vacuum right. This is why you should always ask your same-day technician about their vacuum-pressure equipment before they touch your vehicle.